Month One- The Why and The Where: Oestrich-Winkel, Wiesbaden, Frankfurt and Amsterdam

Time flies!!  I have already been living in Germany for one month!  It feels like I have already been here for a year!  Thankfully, the adjustment has been incredibly easy.  Although many things are different , so many feel the same.  And I am blessed to be here with my Brock University family.  There is always someone to turn to 🙂

My plan is to make a blog post once a month to capture all of the adventures of the month!  I am keeping myself quite busy here and I can’t maintain weekly blog posts.

The Why-Am-I-Even-Here:  When I chose my university program in 2012, I stumbled across a brilliant program between the Goodman School of Business at Brock University in Niagara, Canada and EBS Universität fur Wirtschaft und Recht in Oestrich-Winkel, Germany.  The program involved spending 2.5 years at Brock University and then moving to Germany to complete the last 1.5 years at EBS.  The program also involves completing two work terms, one in Canada and one abroad, and when I graduate in May of 2016 I will receive, not one, but TWO undergraduate degrees.  Gotta clear some space on my wall.  But first, I need to finish my degrees and write a thesis…

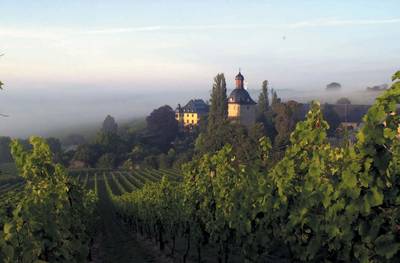
The Where-I-Live: I live in a very small town called Oestrich, which is part of a collection of small towns referred to as “Oestrich-Winkel”.  Oestrich is in the heart of the Rheingau Valley, which is the wine-producing area of Germany.  Everywhere you look there are vineyards.  The flat I am living in is in a 120 year old house that is on a winery.  I literally live on a winery.  The main inhabitants of Oestrich are elderly people and students who attend EBS.  Apparently the Rheingau Valley comes to life in the Spring and Summer, when the sun is shining and the wine is flowing!  I am looking forward to spring, the winter weather here mainly consists of cold rain.  I think the sun has only been our for 2 full days, but at least I am not shoveling snow!

IMG_2098
Vineyards everywhere a.k.a my back yard
IMG_2086
Sun rising behind EBS Schloss Campus


The Where-I’ve-Been: 

Wiesbaden:

Wiesbaden is considered the beginning of the Rheingau area and is the closest metropolis to Oestrich.  I don’t really count Wiesbaden as a trip, as it is only a 20 minute train ride from Oestirch and free using our EBS Student Cards.  It is mainly a residential city but nevertheless it has unique charm, and beautiful architecture as well as a lively ex-pat community!

wiesbaden
Evening out in Wiesbaden

Frankfurt:

Being a student at EBS allows me to travel within Hesse for free which means free travel to Frankfurt, which is the nearest hub for travel across Europe.  Unlike students on a typical semester-long exchange, we are carrying quite a heavy course load, so we do have to pay attention to our studies and pace ourselves when it comes to travelling.  The good thing is we have a whole year and a half to travel around Europe, so we really get the best of both worlds.

We started our travels with a weekend in Frankfurt where we took advantage of the awesome shopping and nightlife!  The MyZeil mall/street has excellent shopping and is also known for the modern architecture.  The large shopping mall has a giant glass hole in the building that is not only visible from outside but also extends throughout the inside of entire building.  The picture below does not do it justice!

We also went to dinner at the traditional German restaurant, “Adolf Wagner”, which is also a Apfelwein Brewery.  I was not a fan of the apple wine, it tasted a lot like apple juice mixed with vinegar, but some people genuinely enjoy it.  I had a very odd vegetarian meal, vegetables trapped in a dill flavored gelatin, but the potatoes on the side did not disappoint!

IMG_2125
Traditional German dinner at Adolf Wagner
IMG_2114
Famous modern architecture: MyZeil  

Amsterdam:

Although it involved a 15-hour round trip bus ride, Amsterdam was so worth it!  We arrived on a Friday evening and were able to a bit of exploring that night.  We were quite exhausted and chose to sleep around 11 pm, but when you are staying in a 12-bed dorm in a hostel, there is no such thing as a good nights sleep.  Saturday was a beautiful day and we wandered the Albert Cuyp Markt which was fantastic!! It is probably around 2 km of shops and stalls selling everything from cheese and clogs to underwear. The shopping was on point, you really can’t compare European shopping to North American. SO much better!  We also were able to hit up The Heineken Experience which is another must-see when in Amsterdam!  You get to tour the old brewery, learn how to taste the beer, and learn to tap your own beer just to name a few things.  Later in the day we visited the Sex Museum, which was very unique (for lack of better words…it is definitely not a PG place), one of Amsterdam’s  world-famous coffee shops, and a traditional Dutch restaurant (quite a hilarious experience). Lastly we went to a nightclub, which is so different than back in Canada.  We didn’t even go to the club until 2 a.m., which is when bars close in Canada….needless to say the Dutch have mastered the art of clubbing!

On Sunday we visited the oldest part of Amsterdam.  We were able to see the Anne Frank house from the outside, but there is a 2 hour wait to get in and we did not have enough time.  Instead we wandered through the city and enjoyed more Dutch food (Dutch food is so decadent) and eventually made it to the Mega-bus where we had a lovely 10-hour ride home!

I amsterdam
Impossible to get a picture of the I amsterdam sign during the day. So many tourists!
IMG_2145
Albert Cuyp Market, clogs for days.
IMG_2146
Cliche Holland
foodinthewall
You can buy food out of little microwaves in the wall!

Amsterdam is such a unique city, and all of us really fell in love with its charm.  For anyone traveling through Europe, DO NOT MISS IT.  There is not another city like it !

All in all, this first month in Germany has been excellent.  I am finally all settled into my flat, and I am adjusted to the German culture.  So far the hardest class I am in is my German class.  The Germans have definitely figured out the best way to teach a language.  Our professor refuses to speak a word of English.  No amount of English questions or confused looks will result in her speaking English.  She is quite a patient lady.  This is a much better approach, as it is really forcing me to understand and I am learning quickly. If only second languages were taught this way in Canada… All of my business classes are taught entirely in English, which is a blessing! Some of what we are learning in our classes we have already learned in Canada, however they build on the content and concepts in a different way and it is really interesting to learn things from a European perspective.  Next on the travel agenda for February is Munich and Koln!! Looking forward to some more adventures!

Lastly, I found a wonderful quote on the side of a building in Amsterdam, which mirrors my thoughts perfectly:

IMG_2144

“Like all great travellers I have seen more than I remember and remember more than I have seen.”

-Benjamin Disraeli

Kale Green Smoothie

There is no easier way to get get a healthy start to your day than with a green smoothie!  Green smoothies are becoming wildly popular now, so I thought it was time that I share my staple recipe.  This is the one green smoothie that never fails me and always fills me with energy and goodness!

IMG_2080
His & Her Green Smoothies

According to the Canadian National Food Guide (and I am sure many other ones), an adult female should eat 6-8 servings of fruits and veggies per day!  Unfortunately, many do not reach the target.   As a vegetarian, I try to get at least 8 servings everyday.  With this smoothie you are getting 4 servings of fruits and veggies. This past week, having moved to Germany ( post to follow) , has been a bit off pattern but I will be back to normal in no time!

IMG_2072
Fresh kale!

Short note on my blender:  most green smoothie enthusiasts have very powerful blenders (around 1000 watts, Vitamix and Ninja are popular brands) that are often expensive.  A blender like that is not in my budget at the moment.  I have a 750 watt blender from Walmart, and it works just fine for me.  I blend my smoothies in stages so I do not overwhelm the blender, but if you have a more powerful one you can blend everything at once.  I just bought a blender in Germany and the only one I could afford is 300 watts, so I will let you all know how that works out!

Kale Green Smoothie

Serves 2, or 1 large serving

1 large leaf of Kale, torn from the stem

1 1/2 cups water ( can also use coconut water or a juice)

1 ripe banana (you can freeze them however I prefer not to)

1 big handful of frozen fruit of your choice (I rarely measure anything, so if I were to guess it is probably around 1 1/2 -2 cups)

(1) Tear the kale from the thick stem in the center of the leaf. Do not blend this, I have tried and it is like putting wood chips in your smoothie. YUCK.   Place the torn kale in your blender and add 1 1/2 cups of water.  You may have to add more liquid when blending if you are using a low-wattage blender like me. Blend the kale and water together.

IMG_2074
Whats left of the kale leaf!
IMG_2075
Torn kale & water

(2) Peel the banana, break it into three pieces, and blend with the kale water.

IMG_2077
Banana, kale and water

(3) Lastly add a large handful of frozen fruit.  I like fruit mixes, the one below is a mango, peach and strawberry blend.  You can also use fresh fruit, but you would need to freeze the banana (peel before freezing) or add a couple ice cubes so the smoothie will be cold.

IMG_2079
1 large handful

You can store the smoothies in the fridge for about a day, but they  taste much better immediately after blending. The smoothie will separate a little if left sitting out but all you need to do is give it a little shake or a stir!

The beauty of this basic recipe is that it is so easy to switch up.  I will switch up my greens  (spinach and spring mix work well) and my frozen fruit every week or so.  It is always best to change the green, as to introduce different nutrients into you body.

Make sure you enjoy daily!!!

xo talkveggiestome

Roasted Chickpea & Veggie Bowl


My favourite way to cook my veggies is in the oven! Nothing can quite measure up to the flavours and textures that result from a 400 degree oven!

IMG_2041
I quickly devoured two of these bowls!

This past week has been absolutely crazy! I have started to move out of my house, pack for Germany and celebrate the holidays with my family. Needless to say I have not been creating my usual kitchen masterpieces (open to interpretation ).

With only a lonely tin of chickpeas, 2 heads of broccoli and three carrots, I was determined to feed myself some thing delicious! Thus, the “Roasted Chickpea and Veggie Bowl” was born!

IMG_2038
Toss in olive oil and spices right on the baking tray!
IMG_2037
Only veggies on hand!


Roasted Chickpea & Veggie Bowl

This recipe is ideal for substitutions, below are the veggies that I used, however you can use any veggie that lends itself well to baking.  Many things would work, such as: zucchini, sweet peppers,  beets, cauliflower etc..  As usual I did not measure any of the spices, I simply tasted as I went.  If I were to guess, I used roughly 1 teaspoon of garlic powder but you can use any spice mix you wish.  I often use cajun seasoning or curry powder.

What I used:

3 carrots, peeled and roughly chopped

2 heads of broccoli florets, roughly chopped

1 15oz can of chickpeas

Olive Oil

Salt and Pepper

Garlic Powder

Preheat oven to 450 degrees.  Line two baking sheets with parchment paper (I ran out so I had to use tinfoil).  Rinse the chick peas with cold water and pat dry on the counter between two paper towels or clean tea towels.  Pour chick peas onto a baking tray, drizzle with olive oil and sprinkle liberally with pepper and salt.  Sprinkle a controlled amount of garlic powder on the chickpeas, so there is a thin even layer covering them.  Toss the chickpeas with your hands so they are all coated in the oil and spices.

Place the chopped veggies onto the other baking tray.  Repeat the same process using the olive oil, pepper, and salt.  I did not use garlic powder on my veggies because I did not want the garlic flavour to overpower the dish.

Place both trays in the oven and bake for 10-15 minutes (depending on your oven).  Both of my trays did not fit on the middle rack so I placed the chickpeas on the bottom rack. I was a bit nervous that they would brown too quickly, but I kept an eye on the them and it worked out well!   After 10-15 minutes take both trays out of the oven. Flip over the veggies and stir around the chickpeas (I just used a spatula).  You can also try giving the trays a shake, but I find that doesn’t work too well.

Taste each before placing back in the oven!  Add more seasoning if necessary!  I added more of everything 🙂

IMG_2039  IMG_2040

Fresh out of the oven, toss together in a bowl and enjoy!  If you try it, let me know how it turned out for you!

Now I have to get back to some serious packing…

xxx talkveggiestome

Moving to the Land of Meat and Sausages… A vegetarian in Germany

In only 10 (TEN!!) days I will be moving to “The Land of Meat and Sausages”…. aka Germany! Yes I may be perpetuating stereotypes a little with this title….please forgive….

I am moving to Oestrich-Winkel, Germany for a year and a half (!!) to complete my undergraduate degrees.  I have known for two and a half years that I would be moving to Germany, aaaand yet just this past September I fully transitioned to vegetarianism.

I have really great timing don’t I?

EBS
Oestrich-Winkel, Germany  (photo property of EBS)


It never really crossed my mind that it may be difficult to maintain my vegetarian diet while living in Germany until a few people expressed concern! NO WIENER SCHNITZEL?? OH THE HUMANITY!      *eye roll*

Will you be abandoning vegetarianism for the sake of enjoying German sausages?  Nah, I’m good.  Really, I’m good.

Will you be able to find your staple grocery items in Germany?  oh….fair point……. 

I am not familiar with what a traditional grocery store looks like in Germany.  I am accustomed to big-box grocery stores, which always always have a vegetarian section.   The top staples in my diet (that I cannot live without) are: unsweetened plain almond milk, chia seeds, legumes, natural peanut butter and quinoa.  My diet is supplemented by a shed load of fruits and vegetables, but I am not concerned about that in Germany!

To be honest, I am not too concerned about buying legumes there either.  I consider those to be a fairly international staple.  And since the explosive popularity of quinoa in 2013, I am sure I will not have a problem finding that.

I am already aware that I will not be able to get my beloved all-natural, smooth peanut butter in Europe.  Having loved peanut butter since day 1, I know that I must bring that with me. My one big question is chia seeds.  I average about 3 tablespoons a day, and I tend to fly through them quicker than I think.  I am planning on travelling over with a big bag of them, but hopefully I will find somewhere to buy them.

So I consulted with the internet and I found some vegetarian-in-Germany articles and blogs mainly containing information about dining out in Germany.  No word on chia seeds.  Well I’m sure I will find out soon enough!

If anyone has any advice on shopping/surviving as a vegetarian in Germany, or general advice about moving to/living in Germany please help a girl out !!

🙂 talk veggies to me

On-The-Go Chia Oat Power Bowl

I often get bored eating the same two take-to-work breakfasts. So the only logical way to switch things up is to combine my two favourites! One of my co-workers also jumped on the chia seed pudding bandwagon, and she started to microwave her pudding and eat it warm.  I thought it was a brilliant idea!  It makes the pudding a warm breakfast hug on a cold winter morning! I was getting a bit tired of chia seed pudding, so one evening I decided to cut it with some large-flake rolled oats.  Thus this harmonious recipe was born! chiaoats3chiaoats

It takes 3 minutes to prep before bed, and only 3 minutes to cook at work in the morning!

chiaoats1Chiaoats2

Chia Oat Power Bowl

1/3 cup rolled large-flake oats (can use regular quick oats, but I much prefer the texture of the large-flake) 3 tablespoons of chia seeds 1 tablespoon of natural nut butter 1 teaspoon of ground cinnamon 1 or 2 teaspoons of natural maple syrup (or sweetener of your choice) 1 teaspoon of natural vanilla extract 1 cup of plain unsweetened almond milk (or milk of your choice) Toppings of your choice.  Personal Favs: Raspberries, sliced banana, blueberries, hemp seeds, dried cranberries, walnut pieces (when I can afford them)…

On-The-Go version:

In a small mason jar, or other container with a good seal, combine the cinnamon, vanilla and almond milk.  Seal and shake lightly. Toss in the fridge until ready to use! Combine the oats and chia seeds in a microwave safe container and smear the tablespoon of peanut butter on the side of the container.  Seal and toss in the fridge when ready to use! When you are ready for your breakfast, simply shake and pour the almond milk into the oats/seeds and stir lightly.  Mircrowave on high for 2 minutes.  Take out and stir.  Place in the microwave for 1 more minute.  WARNING: Do not turn your back on this! The chia seeds have a tendency to puff up in the microwave.  In the last minute the risk of overflow is high.  The varies with the strength of your microwave.  I use a very used-and-abused work microwave, so it is a bit weaker than my one at home.  Monitor your dish carefully!

If You Don’t Like Microwaves:

You can easily make this on the stove top! Simply combine all ingredients and cook on medium-med/low until thickened to desired consistency.

OR

You can give this recipe the overnight treatment!  Simply combine all ingredients in one container (omitting the nut butter) and store overnight in the fridge.  In the morning, give it a good stir and top with the nut butter and other treats!

Testing out the “Wakie” App

A nice fellow from Miami woke me up this morning.  It was an awkward phone call.  What do you say to a complete stranger at 7:00 am?

There has been a lot of buzz in the last 24 hours about an app called “Wakie”.

Wakie icon


Trending on the Apple App Store last night, Wakie is a free app that is branded as a “Social Alarm Clock.”  The app allows you to receive an anonymous wake-up call from a complete stranger. The concept behind the app is that people repeatedly hit the snooze button on their alarm clock.  It is said that being woken up by a phone call forces conversation, which stimulates the brain, wakes you up, and is a more positive way to start the day.

Setting Up Wakie

When you first sign up for the app, it requires your country code and phone number.  They do say that “your number is anonymous and will never be given away,” so make of that what you will.  I did it anyway, what is privacy in the 21st century??  After you enter your number they send you a confirmation code by SMS.  MINE DID NOT COME UNTIL 12 HOURS LATER. What is this??? I was way too impatient so I opted for a “voice call” which sent me the code much more quickly.   They then ask for your birth date and gender to more “accurately match you up.”  At this point I was getting serious Tinder vibes…….

BOOM. I am now part of the “Wakie” community. I had the option of setting up a profile, or even linking Wakie to Facebook (where they will link my photos and name) which I opted not to do.  I had a feeling this app would get weird so I chose not to put a photo.

IMG_1999
This is what my profile on Wakie looks like. It shows me how many people I have woken up and how many times I have been woken up.


The “Community”

The icon on the bottom right leads to a news-feed style messaging board which mainly consists of three things:  People saying “hi”, people giving shout outs to those who woke them/people they woke, and lastly (unfortunately) a lot of REALLY THIRSTY TROLLS. The maturity level was appalling.  Girls who opted to put nice pictures of themselves on their profile were getting trolled SO HARD, people were just being generally creepy, in an “omegle” kind of way, if you know what I mean…..If this app ever introduces picture messaging…………. o_O.  Reading the message board left me feeling a little weirded out.  What on Earth was I going to get in the morning….

Alarms

It is very straightforward to set up alarms on Wakie.  Wakie even promises that if no one is available to call me at my preferred time, I will get a call from a robo-lady.  This did not happen to me, but from what I hear they are very pleasant robot ladies.  Wakie also gives you the option also have the option to set up a “back-up alarm,” in the case that you sleep like the dead or do not trust Wakie to wake you up.  I had serious doubts about this app, so I also set another normal back-up alarm on my phone.

IMG_2001
Setting alarms. 

And then… at 7:15…my phone rang.

When I looked at my caller-id, it just showed four random numbers, so I did not know the number of who was calling or where they were calling from.  This is good.  I answered with a groggy “Hello.” All I heard was white noise….then a thickly accented voice said my name….and then crackling. Okay this shit is WEIRD.  Wakie repeatedly says that in order to wake someone up, you need a strong internet connection, I am assuming this person did not have the greatest connection, hence the crackling. I held on for a few more seconds, and the voice says “What are you doing right now?” OH THIS IS CREEPY. I’M OUT. Hung up on that.

I must admit I was kind of prepared for that after reading the message boards.  BUT I WASN’T GIVING UP! I quickly set another alarm for 5 minutes later, and boom, my phone rang again!  This time is was a very cheerful man from Miami!  A much more pleasant experience, he wished me a good day and hoped the snow wasn’t getting me down.  The call was brief, but I hung up feeling positive!


Waking People Up

Alright, now I wanted to try to wake people up.  You tap the yellow bar that says “Wake Someone Up” and then it proceeds to “search for matches.”  It took around ten minutes, and then I had a “sleepie” to wake up!  I tentatively accepted the call, and waited as the robo lady connected me.  AHHH someone answered. WHAT DO I SAY?  It was some guy from the States, he sounded very groggy.  We exchanged good mornings and celebrated the fact it was Friday. That’s it, that’s all. Pretty simple!   I wanted to try again and I opted to wake up another person.  This time I was routed to a male’s voice mail. I left a little message and moved on with my life.

IMG_1998
How to wake up “sleepies”


Final Thoughts

Aside from all the trolls, this app is intriguing.  It is also awkward.  Talking on the phone to a stranger is hard!!  If I do this again, I will definitely take a few seconds to figure out what I will say, because there is a lot of awkward silence.

I am also curious about the intentions of this app.  The two calls I received were both from males, and the two people I called were also male.  I am seriously wondering if they intentionally match up the opposite sex.  If this is the case, I will be a little disappointed, THIS IS NOT A DATING APP. DO NOT ENCOURAGE THE TROLLS.

ALSO, I had the sound turned-on on my phone.  I am not sure if this app would work with the sound off, as it is the ringer of your phone waking you up.  Additionally,  all of my calls came in a few minutes before my actual wake-up time.  My 7:15 call came at 7:12, but I understand timing would be difficult with this app.

Yes, many people are curious about privacy when it comes to this app.  If you have doubts about privacy, just don’t use the app.  Personally, I am over-trusting in technology, and it hasn’t hurt me yet!  The worst problem I see is troll harassment.  You can flag posts as inappropriate, but there seems to be a need for a moderator on the message board.  Reading those posts is really a turn-off.

So technically the creepy guy woke me up, not the guy from Miami, but I like to think that Mr.Miami is a more accurate reflection of the app.  I have a feeling that this app will gain much more momentum in the next few days. As long as you understand that trolls are gonna troll, troll, troll, troll, troll, this app is seriously worth a try!  


p.s. eat ur vegetables


Easy Chia Seed Pudding for Those Who Literally Can’t Even

You CAN even.

Chia seeds are easy to use.  Just don’t spill them on the floor.

Black or white, all chia is created nutritionally equal!  Two seedy tablespoons are packed with 11g of fiber, 4g of protein, magnesium, iron and calcium just to name a few.  Not to mention they are the power behind every 90s kid’s beloved ceramic chia pet. You can get chia seeds at any bulk store, or the organic aisle in grocery stores.

Not only will they fill your stomach and nourish you, they provide at least an hour of in-cubicle entertainment: getting the seeds out of your teeth.

SIDE NOTE: Yes, I know there are dozens of way prettier blogs with chia seed pudding recipes complete with beautiful pictures. I started this primarily to record my food/life journey, and to act as my personal recipe repository.  So cheers to you for reading this.  My photos are taken on a struggling iPhone 4s and a student kitchen does not make for beautiful food photography. Often I am too hungry to stop and take a photo.

Basic Chia Seed Breakfast Pudding

You will need a small-medium sized container with a lid.

Combine:

3/4 c of unsweetened almond milk (or almond/coconut mix, or soy, or rice or cow…you get the idea.)

1 to 2 tsp of maple syrup ( or agave, or honey, or stevia, or sugar…catching on??)  Sweetness depends on how bitter you like your life.

1 tsp ground cinnamon.  I legit never measure this.

1 teaspoon vanilla extract. Also never measure.

1 tbsp natural smooth peanut butter (optional, for those pb haters)

Use a fork to whisk together above ingredients.  After you have whisked, add in 3 tbsp of chia seeds. STIR WELL. They tend to like to stick together and form a gelatinous clump at the bottom of the container. Appetizing right?

Let the mixture sit for at least 20 minutes, or in my case, overnight in the fridge.  Often when I take them out of the fridge they have all stuck to the bottom and didn’t even pudding at all. But just grab a spoon and stir them vigorously.  That should fix it.

I always top them with fruit! Chop it up and put it on top!

No i do not have time to put them in a damn mason jar and make a nice parfait.  But feel free to do that.

Mixed Bean, Squash and Freekeh Stew

I accidentally created a recipe last night and it actually tasted amazing! I must record this so it does not slip my mind. Squirrel.

I recently bought a box of freekeh (beacuse it was on sale, and sounded cool) and I really didn’t know what to expect.   It is basically roasted green wheat seeds, similar in appearance and texture to bulgur, and it smells like the earth when cooked.  My original intention was to just eat the freekeh with the stew on top.   After doing a bit of research, I learned that nobody eats freekeh plain.  So this happened:

Mixed Bean, Squash and Freekeh Stew

In a large saucepan combine:

2 tbsp of olive oil

1 lb of peeled, butternut squash (cut into 1/2 inch pieces or just cut it however you damn well please)

1 chopped red bell pepper

2 peeled,sliced and halved broccoli stalks

1 diced purple onion

4 cloves of garlic, crushed

1/2 of a jalapeno pepper, seeded and diced

Heat veggies over medium heat and spice that shit up with lots of pepper and salt.  Stir often so you don’t scorch your only good stock pot…

After about 7 minutes or when the onion has turned translucent or you are sick of stirring it, add:

1 tbsp chili powder (spice up your life)

1 teaspoon cumin (spice it up some more)

1/4 teaspoon cinnamon (your life is officially spiced-up)

1 24 oz can of diced tomatoes and their juices

2 19 oz cans of mixed beans (I can’t remember if they are 19 oz, just use the standard size. You know what I mean. RINSE THEM. Srsly.)

3 cups of veggie broth (Or do it the lazy way like me, and toss in a bullion cube and 3 cups of water)

Juice of half of a lemon

Let that boil, then reduce to a feisty simmer for about 30-45 minutes.  You can test for readiness by stabbing the squash and broccoli stalks with a fork.

While the awesome smell of the stew fills your house, make the freekeh according to box directions. And get your freekon.

When you are done getting your freekon, add cooked freekeh to your stew. Your stew should be done by now.  Feel free to spice up your life (stew) some more.  I don’t know your life, do you boo.

IF YOU DON’T LIKE MY VEGGIES:

Substitute! Switch out for whatever you want, this is stew, not Breaking Bad.  No need to be precise with anything.

Throat-soothing Lemon Ginger Tea

When you feel the scratch in your throat, stop it in its tracks!  This hot drink will sooth sore-throats, calm nauseous stomachs and help relieve the common cold!

In a small saucepan combine:

2 cups of water

Juice of 1 lemon (I slice it, squeeze it up and then toss the slices in)

1 piece of fresh ginger (peeled, about the size of your thumb)

Bring mixture to a boil and then reduce to simmer for about 20 minutes.  The longer you boil the water, the stronger the ginger flavour will be.  Ladle into mugs and enjoy!

It is not sweet at all, so feel free to add some honey to the mug before you ladle it in.  You can also add one lemon ginger tea bag to the mixture if you are looking for a stronger flavour. Also limes and grapefruit slices are a lovely additive!

Enjoy!

-talkveggiestome

Breakfast: The Ultimate Overnight Oats

If you are reading this, I am sure you have already seen a dozen posts from various blogging authorities about overnight oats.

BUT WAIT!! Before you roll your eyes and leave this page, you should know that these are the ULTIMATE overnight oats.

Like any girl with a computer, I too have seen my fair share of overnight oat recipes. And believe me, I have tried a lot of them. Everything from mashed-banana to chocolate. But what I could never find was that staple recipe.  Something that could be the chameleon of overnight oats. Simple, understated, and most importantly, VERSATILE!  So I abandoned all recipes and created my own!

As a chronically hungry girl,these actually keep me full from 8:30 am until noon!!  They are also very convenient.  Prep is only 5 minutes and I can eat them right at my desk in the morning!

Chameleon Overnight Oats (The Ultimate Overnight Oats)

Oats finishedOats

What you need:

1 cup large-flake rolled oats ( I use Quaker or Red Robin.  You can make this with any type of rolled/quick oats.  I like the large flakes for the texture.)

1 tablespoon of chia seeds ( I typically just buy mine from the bulk store)

1 cup unsweetened plain almond milk

1 tablespoon all-natural peanut butter (For a nut-free version, use sunflower seed butter, or leave out entirely)

1/2 teaspoon all-natural vanilla extract ( I will often add up to one teaspoon, all depends on taste)

1 tablespoon pure maple syrup (Can substitute for honey/agave syrup/ any other sweetener.  Add slightly less than a tablespoon if using honey or agave syrup.)

1/4 teaspoon cinnamon (to be honest, I never measure this, I just sprinkle until it feels right!)

Seasonal fruit for garnish (optional)

1 small handful of hulled hemp seeds for garnish(optional)

Add all ingredients except for the fruit and hemp seeds, in a plastic or glass container.  Mix well to combine.  Your oats will have a slightly soupy consistency.  But not to worry, the chia seed and oats will quickly fix that!  Be sure to mix as best you can as the peanut butter often needs to be coaxed apart and the chia seeds tend to stick together.  Seal with a lid and store overnight in the fridge!  Come morning, top with seasonal fruit and a small handful of hulled hemp seeds!

For an added protein boost:

For those who need a bit more protein to tide them over until lunch, fear not!  You have options!

1.) Yogurt:

Use 3/4 cup of almond milk half a cup of fat-free, plain, greek  yogurt.  The secret to overnight oats is a 1:1 ratio between your wet ingredients and your dry!  As long as you follow that rule you will not have soupy (or extremely gelatinous) oats! Any type of yogurt works fine, I just prefer greek for the higher protein content!

2.) Overnight Proatmeal:

Bust out your favorite protein powder!!  This serving of oats will automatically be larger.  Increasing your dry ingredients means you must increase your wet!  Follow the above recipe, except add 1 scoop of your favorite protein powder (mine is ProFlex20 Dutch Chocolate), and about 1/4 cup-1/2 cup more of almond milk.  A standard rule of thumb: for every scoop of powder you add, add equal parts milk.  Mix well to combine and then re-evaluate the consistency.  If all the liquid as been absorbed after mixing (with a batter like consistency) you should add more milk.  It will depend on your protein powder and how much you choose to add, but keep mixing and adding milk as needed until you reach a slightly liquid consistency.

– Leave out the maple syrup/sweetener: I find the protein powder adds more than enough sweetness, however this is entirely up to you! You can always make it without the sweetener, try it in the morning, and add sweetener if needed on top!

Options

The beauty of this recipe is the versatility.  For a chocolatey morning, add about 1 teaspoon of coco powder and top with some sliced banana!  The mix-ins are endless! Jam, mashed fruit, cooked apples, chopped nuts,or even instant coffee powder (or coffee) for an extra little punch (mmm coffee and coco powder) !

For a more decadent treat try nutella or cookie butter!

Don’t be afraid to experiment!!! As long as you roughly follow the 1:1 ratio, these oats are nearly fail-proof!!!

Enjoy! xox